WinImages F/x loads the file types which are listed below.
|
| Quick Nav Bar | ||||||||
|---|---|---|---|---|---|---|---|---|
| << Previous | Contents |
Selection |
Op Index |
Parent | User Notes |
Index |
Glossary |
Next >> |
|
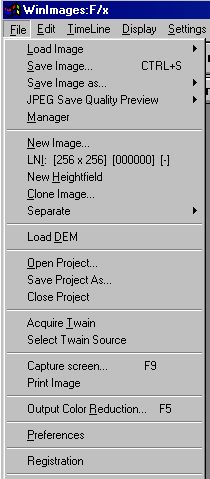
This option will load an image into a view. The Load Image item is operated through a series of submenus that detail a number of recently used (hence the term MRU... Most Recently Used) filesystem locations. This allows you to quickly and easily get to your image files without having to navigate, and re-navigate, and re-re-navigate...
WinImages F/x loads the file types which are listed below.
|
|
The image types that are presently loaded are as follows:
|
Having said all that, The decade-old GIF handling code in WinImages F/x will load and save both standard and transparent GIF images. If the GIF has a "transparent color" set, the area(s) defined by the transparent color will result in a completely transparent alpha channel in the loaded image. (By the way, PNG supports this limited kind of transparency and partial transparency... and so do MNG animations... unlike GIF, which is limited to on, or off. Hmmm. Need we say more?)
Typically, 24-bit images saved in this format will yield file sizes than any other lossless image format we know of except PNG; PNG can achieve very similar compression ratios. Because TRIM is a file format that is limited to Black Belt Systems software, we suggest you use PNG rather than TRIM as your preferred lossless image save format.
Until PNG was developed, TRIM was the highest compression lossless format in existence; the format is now only included for compatibility with previous versions of our software. We will no longer extend this format; instead, Black Belt Systems joins the thousands of developers who promote and support the PNG (and MNG) file formats.
The JPEG (Joint Photographic Experts Group) format images are highly compressed, 24-bit color inaccurate images. No mask or alpha channel information is saved; the image compression method used is "lossy". WinImages F/x's save module provides you with the ability to set the compression used from light to heavy. More compression results in more loss of image detail.
JPEG is quite useful for some things... things you aren't too concerned about... and absolutely the worst thing to use for others. Consider: JPEG loses some quality when it compresses an image. Not a lot, if you use maximum quality (minimum compression), but still, some loss of quality occurs. If you're a scientist or a doctor, don't think "loses quality", instead think "loses and changes data"! Or, if that's not a pointed enough statement, think, "Lawsuit!"
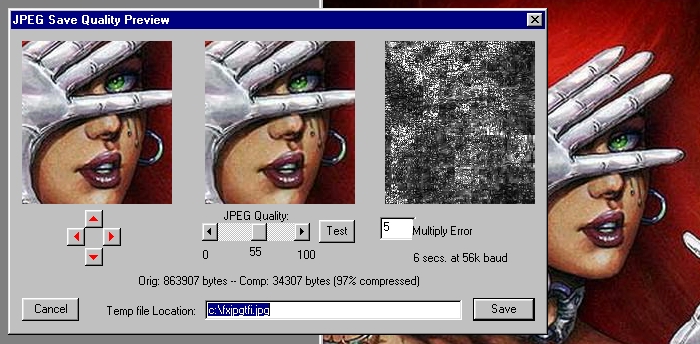
Here is an example of what happens to image data when saved in JPEG:

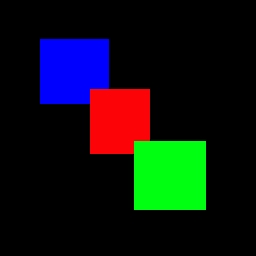
These three images tell the entire story. The original image was sharp and clear; the JPEG image, though saved in the highest possible quality, is changed radically from the original. JPEG is very bad at dealing with sudden changes in image content. It does better with smooth images, but not that much better, actually. If you take an image, save it in JPEG, and the subtract the saved image from the original, you'll see a lot of differences how up. Subtle details are lost.
Consider what happens if you're working on an image over a number of sessions. Each time you go through a save and load sequence in JPEG format, it deteriorates a little more (or a lot, if you compress it a great deal). The lesson, and the rule that comes from it, is obvious: Don't ever use JPEG as a storage format for an image you're working on, or for an image that will be used in another image (unless you positively know that the loss of quality won't matter, for whatever reason.) JPEG is really good for archival storage of images you like, but aren't "serious" about. On minimum compression, a single use of the JPEG technique on an image will not seriously degrade it visually. And that's what you'd normally do with an archived image. Store it once, then load it as you please to view it, as many times as you like. If you will be doing multiple loading and saving of a particular image, you should use the PNG format. PNG will give you at least twice the compression of a standard IFF24 or TIFF with absolutely no image loss, so it is perfect for ongoing projects.
The JPEG file saver has an option at the bottom of the Save Image dialog called JPEG Quality. This control allows you to specify the quality of the resulting saved image. The quality is measured on a scale from 0 (worst quality) to 100 (best quality). Increasing the quality will increase the size of the output file (less compression), and decreasing the quality will decrease the size of the output file (more compression). Remember, the lower the quality the more compression you will achieve, but this will be at the expense of losing additional image information.
|
Image files can also be loaded by using Drag and Drop from the file manager. Drag and Drop is a means of loading files into a program directly from the File Manager. In WinImages F/x image files can be dragged into the view windows.
To load an image using Drag and Drop:
If a file is not identified as a known image type, the message: "Image file type is not recognized." is displayed. If you should encounter an image file that we do not read, we are generally willing to consider adding the format to the software. What you need to do is send us an email at support@blackbeltsystems.com with an explanation of what you know about the file format. We may then ask you to email one or more sample images to us. Do not send images without asking first, as the server discards attachments that we have not authorized beforehand! At that point, we will see what we can do to extend the program to handle the new image format.
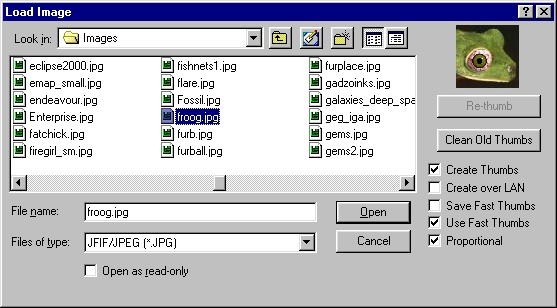
Create Thumbs, when checked, tells Fx you want to see thumbnails.
Create Over LAN tells Fx that you want to create thumbnails even when you are connected to another machine (make sure this is ok with the machine's owner, if you have save checked also.)
Save Fast Thumbs tells Fx that you want it to create a directory inside each image directory you visit in the dialog, and inside that directory, you want it to store thumbnail images. The benefit of this is significant: the next time you pass over that image in the dialog, instead of reading the image and generating a thumbnail, Fx will get it from the thumbnail subdirectory and it will appear almost instantly. You can, of course, generate a lot of thumbnails this way!
Use Fast Thumbs tells Fx to use the fast thumbnails it has stored. Usually, you want this behaviour.
Proportional tells Fx that you want the thumbnail to be the same shape as the image. This looks more normal, but uses less of the thumbnail area for non-square images. You might prefer to have a distorted thumbnail, since you see more of the image that way. You decide.
Re-Thumb tells Fx to generate a new thumbnail over the stored fast version. You might want to do this if you know the image has been updated by another application.
Clean Old Thumbs tells Fx to read the entire fast thumbs directory, match the thumbnails inside with the images in the directory you're working in, and if there is not a matching image, to delete the thumbnail. This helps you keep your thumbnail directories from getting out of hand over time. Every once in a while, when you've got a minute or two to spare, press this button.
|
Save Image As uses the same type of MRU submenu as does Load Image. See Load Image, above, for an explanation.
Current save format options include:
|
|
To save to an Animator FLIC or Video for Windows AVI animation, each frame must be saved in sequence. Therefore, you must set the Save Result option in the Sequence Controls so that each frame gets saved into the animation file as it is created. This means that you will also need to specify that the file type to be saved as an FLI/FLC or AVI.
If you need to save transparent GIF's, this can be done by using special palette control techniques. The rendering controls (under the main file menu, Output Color Reduction) contain a list of all colors selected for the rendered palette, and the color you right-click upon prior to a save will be the transparent color. Of course, you must ensure that this color exists in the image only where you want the image to be transparent; you can do this by picking a color that is very different from any in the image.
You can also save GIF and MNG animations as a special feature of the filmstrip. This option is available in the filmstrip menu.
You can pan around the image by dragging the images with the left mouse button, and there are some useful cue displays such as download time and file size available with each test image you generate. In order to create the test images, FX actually creates an actual JPEG file; you can change where it does this. The test file is deleted when you exit the preview window.
The left pane is the original image, the center pane is the saved test file, and the right pane is the damage amplifier.
 |
JPEG Quality Preview uses the same type of MRU submenu as does Load Image. See Load Image, above, for an explanation.

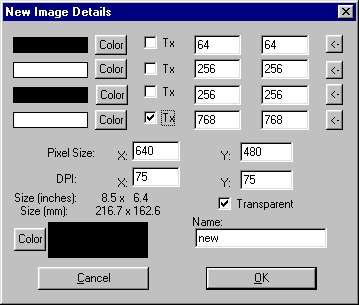
The Name field allows you to specify a name for the new image. The name of the new image will be provided by the program if you do not specify one. The Pixel Size setting allows you to specify the size of the new image in pixels. This setting will default to the last values that were entered. The DPI setting allows you to alter the Dots per Inch of the new image. You will notice that as the Pixel Size and the DPI are altered, the size in inches and millimeters will change to reflect the new size of the image. The Specify Initial Color allows you to select the color of the new image. The control, when pressed, will provide you with a palette of colors to choose as the new image color. The color will default to the last selected color. If you select the Transparent option, the image will be created with an active, completely transparent alpha channel.
At the top of the dialog are four handy presets that WinImages F/x will remember when you exit the program and restart it later on. These presets may be chosen by simply pressing the arrow button at the right of the preset; this will immediately exit the dialog using those settings.
For more information on the texture generator, Click Here.
|
The clone command is also available from the Quick Ops context submenu for image views.
See Also: Making More Memory Available
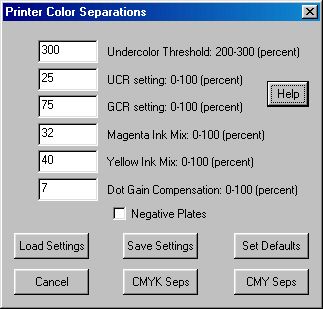
The separated image created by the first three selections is constructed using layer modes to recombine these separated channels into a full-color image.
|

The fourth choice, Printer, can create professional-quality color separations. For details on the color separation process, please see Appendix M
Step by Step Instructions for Capturing Screens
Screen Capture Controls
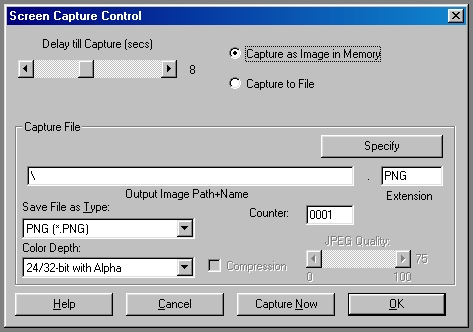
Delay till Capture: This control allows you to specify the delay time (in seconds) before the screen capture occurs. This allows you time to switch to another application, or to rearrange WinImages F/x's screen elements. The delay can range from 0 (no delay) to 15 seconds.
Capture to Memory/File: These radio buttons allow you to select if the file will be captured and placed into an image view in WinImages F/x, or saved to an image file. If Capture as Image in Memory is selected, then the screen capture will be placed into an image view in WinImages F/x. If Capture to File is selected, then the screen capture will be saved into the specified file name and format located in the Capture File section of the dialog.
Specify: Pressing this button will access a standard file requester which can be use for setting the image path, image name, file type, and file type options. After you have set these parameters, press the Ok button to confirm the changes and return to the dialog. You can alter any of these parameters from within the Screen Capture dialog by changing the appropriate text entry field, or drop down box entry.
Output Image Path+Name/Ext: This text entry field is used to specify the image path and file name for the screen capture. This information will be used to determine where the capture will be saved on your hard drive, and the image file name. The extension is automatically determined by the file type. For example, Targa files are saved with a .TGA extension by default. This can be changed to any extension by entering in the desired extension in the Extension box. It is important to remember that you are required to have a complete path and file name for any file that is to be saved. If you are unsure about the image path or name, you should use the Specify button to select a path and file name.
Save File as Type: This drop down box contains a list of all of the available save types in WinImages F/x. The file type that is selected will be used as the file format for the screen capture. This save type is changed by simply double clicking on a new file type. Each new file type will have various options associated with it. These options are controlled through the Color Depth and Compression controls. For example, if your Save Type was set to Bitmap, then you would have the option to save it as 24 bit, 16 bit, 8 bit, 4 bit, or 1 bit bitmap that can be compressed or uncompressed.
Color Depth: This drop down box contains all of the available bit depth (number of possible colors) for a file type. Each file format in the Save File as Type drop down box has different bit depths associated with it. Some formats (like JPEG) only have one bit depth (24 bit). Other formats (like Bitmap) have multiple bit depths for saving. In most cases you will want to select a 24 bit depth for high quality screen captures.
Compression: The compression check box allows you to select compressed or uncompressed for an image file format. It is important to remember that not all image file formats support compression. If the file format does support compression, then the check box will be available. If no compression method is available for the current file type, then the compression check box will not be available.
JPEG Quality: The slider is only available for JPEG image files. This control allows you to specify the quality of the resulting saved image. The quality is measured on a scale from 0 (worst quality) to 100 (best quality). Increasing the quality will increase the size of the output file (less compression), and decreasing the quality will decrease the size of the output file (more compression). Remember, the lower the quality the more compression you will achieve, but this will be at the expense of losing image information.
Counter: The counter will put an automatic four digit extension on to the current capture file name. This allows you to capture a number of sequential screens that have an identifying number. This number is automatically incremented whenever a new screen is captured. This counter can only be reset by entering a zero value.
When you select this menu item, the system printer dialog will open. Select the printer you wish to use. The dialog may appear slightly different to you, depending on the type of printer you have.
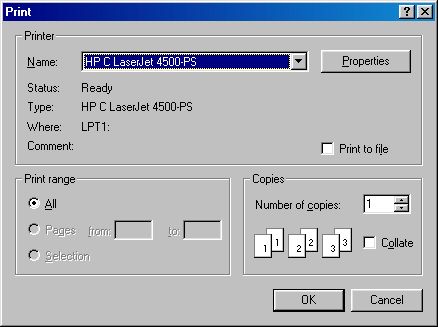
If needed, adjust any of the printer options by opening the Properties dialog as well. Then click OK. The dialog may appear slightly different to you, depending on the type of printer you have.
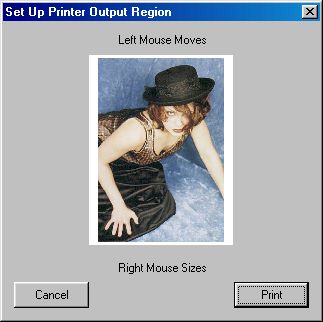
In this dialog, to adjust the preview, drag the image using either the left or the right mouse buttons.
If you drag using the left mouse button, the image will move.
If you drag using the right mouse button, the image will resize.
If you select Print, then WinImages F/x will send the image to the printer (or to the network spooler if you are using a network printer).
If you select Cancel, the print job will be aborted before anything is sent to the printer or the spooler.
The print command is also available from the Quick Ops context submenu for image views.
| Quick Nav Bar | ||||||||
|---|---|---|---|---|---|---|---|---|
| << Previous | Contents |
Selection |
Op Index |
Parent | User Notes |
Index |
Glossary |
Next >> |
| WinImages F/x Manual Version 7, Revision 5, Level B |