|
|
|
|
|
|
|
|
|
|
|
|
|
|
|
|
|
|
|
|
|
|
|
|
|
|
|
|
|
|
|
|
|
|
|
|
|
|
|
|
|
| Quick Nav Bar | ||||||||
|---|---|---|---|---|---|---|---|---|
| << Previous | Contents |
Selection |
Op Index |
Parent | User Notes |
Index |
Glossary |
Next >> |
|
||||||||||||||||||||||||
|
||||||||||||||||||||||||
|
Choosing the active method can be done using the keyboard (using the I and D keys when an image window has the mouse focus) or via the dialog available from the menu selection Settings / Change Working Method.
Each of the area selection modes is used in the same relative manner. For most of the area selection methods the left mouse button sizes the area and the left and right mouse buttons pressed together move the area select. Both Working Methods (Immediate Painting and Draw First) can have area selections add or subtracted from the original area. Areas may be added by pressing the SHIFT key while making the area selection, and areas may be subtracted from the area selection by pressing the CTRL key while making the area selection. This allows you the greatest amount of freedom in creating complex area selections in an image.
There are two types of area selection devices in WinImages F/x. The first is an area selection tool or mode. The area selection tools allow you to specify where the current operation is to be applied. These tools include: Freehand, Polygon, IShapes, Rectangle, Rounded Rectangle, Ellipse, Polyarc, Spline, Numeric Rectangle, Color Wand, Bezier Curve, and the Entire Image. These tools can be altered through use of the area selection modifiers. The modifiers are: Color Key, Splatter, Exclusive Or, Intersection, Union, Hold Aspect Square, Exclude or Complement, and Hold Aspect to Image (Action or Source). These modifiers can be applied to the various tools to create new and unusual areas for application of the many operations.
The Transparency controls are used to specify the amount of transparency and the edge blending level for an area selection. The Transparency is the amount that a source, alpha channel, or even an effect will show through the current or action image. The edge blending percentage is the amount of allowable blending on the edge of the area select.
The Transparency level slider allows you to specify the transparency as a value that ranges between 0 and 255. A setting of 0 will result in the effect being completely transparent, and a setting of 255 will make the effect opaque. The specified transparency level can be applied to all of the effects in WinImages F/x.
The Edge Blending control allows you to specify the percentage value of the entire area select that is to be used for edge blending. The control can range from 0% to 100%, and affects the horizontal slope of the graph. A setting of 0% will result in there being no edge blending, and a setting of 100% will result in an edge blend that extends from the edge of the area select to the center. You can also perform an anti-aliasing operation by setting this control to 1%. This setting will not perform a true edge blend.
There are several preset edge blending levels. These presets are: Flat, Soft Edges, Broad Edge Fade, and Conical Fade. The Flat preset has an edge blending percentage of 0% which will simply place the effect in the selected area with no blending. Soft Edges will perform an anti-aliasing at the edge of the area select. The Broad Edge Fade has an edge blending level of 50% that produces a nice fading effect. Conical Fade has 100% edge blending.
This dialog also contains a control to alter the width of the area selection. This means that you can specify exactly where the edge blending is to begin. The control ranges from 0 to 100%, and effects the width of the transparency graph. For example, a setting of 50% would result in the edge blending beginning 50% into the area selection. It is important to remember that image information outside of this radius will be lost.
There are also trend graphs for each of these transparency modifiers. Setting the trends for an operations will allow you to create effects that fade in and then fade out or even transitions from one image to another. The trend button allows you to set that variable over a set of frames. Each frame of the animation can be thought of as a slice of time. The trends allow you to alter some, all, or none of the variables for a particular time slice. You will notice that the trend graphs have equidistantly spaced vertical lines. Each of these lines represents a frame in the animation. The number of frames can be altered using the Sequence controls... in the Timeline pull down menu.
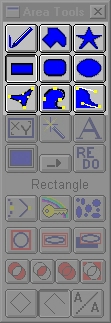 Refer to the picture of the area toolbox at the right for a quick reference as to which area tools can generate paths.
Paths in WinImages F/x are used in two main roles; as area selection initializers for the Particle System operator, and as paths for the Stroke operator. The Unclosed Area button at the bottom row, center, in the area toolbox affects how paths are generated, as does the corresponding menu item in the Area menu.
Plug-ins may take advantage of paths; this depends on the design of the plug-in.
|
The Freehand Tool
The Polygon Tool
The I-shape Tool
The Rectangle Tool
The Rounded Rectangle Tool
The Ellipse Tool
The Polyarc Tool
The Spline Tool
The Bezier Curve Tool
The Numeric Rectangle Tool
The Color Wand Tool
The Font Tool
The Entire Image Tool
Redo the Last Area Selection
The Color Keyed Modifier
The Splatter Modifier
The Exclusive OR Modifier
The Intersection Modifier
The Union Modifier
The Exclude Modifier
Hold the Aspect Square
Hold Aspect to Action Image
Hold Aspect to Source Image
Draw Hollow Shapes
Hollow Shapes Unclosed
Antialias
| Quick Nav Bar | ||||||||
|---|---|---|---|---|---|---|---|---|
| << Previous | Contents |
Selection |
Op Index |
Parent | User Notes |
Index |
Glossary |
Next >> |
| WinImages F/x Manual Version 7, Revision 5, Level B |