
| Quick Nav Bar | ||||||||
|---|---|---|---|---|---|---|---|---|
| << Previous | Contents |
Selection |
Op Index |
Parent | User Notes |
Index |
Glossary |
Next >> |
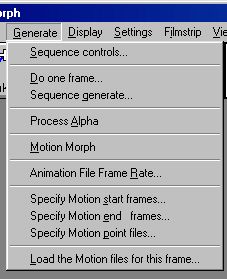
Sequence Controls
This is where the user sets the working parameters for the morph. These include resolution, output format, and number of frames. The descriptions below detail all of this dialogs controls.
Total frames:
The total number of frames in the morph. The film strip is also this number of frames in length.
Begin Frame #:
This is the frame number where morphing will begin for a sequence generation.
Finish Frame #:
This is the frame number where morphing will finish for a sequence generation.
Current Frame #:
When "Do one Frame" is selected, this is the frame that will be created. For example, if you set total frames to 15. A current frame of seven will generate the middle frame, half way between the Start and End frames. If you then set Begin Frame to 1 and Finish Frame to 15, all the frames of the morph animation will be generated.
Anti-Alias:
Anti-aliasing affects the spacial (or position) accuracy of the morph result in distances less than one pixel width. Have this switched on for the best quality result, or switched off for slightly faster operation.
Save Result:
When a morph frame is generated, this switch tells the program to automatically save the resulting image. You must have this selected to save to an AVI or Animator FLIC animation, because each frame needs to be saved as it is created. The files will be saved in the format specified in the Save File as Type option found in this dialog
Output file:
The file name that will be used when the morph result is automatically saved.
Specify:
This opens a file requesters to locate a valid path and file name for the output file. When saving to an Animator FLIC animation this file name will be used directly. Otherwise, the last four characters of the file name (before the extension) will be replaced with the frame number (0001 to 9999).
              ie.
              C:\ IMAGES\ MYIMAGE.TIF  will be changed to
              C:\ IMAGES\ MYIM0007.TIF  for frame seven.
This dialog also contains all of the output file information. This includes format, Color Depth, Compression, and output path and file name. WinImages Morph will automatically alter the output file format if you change the extension of the image name. For example, if you changed the extension from AVI to FLC, morph would automatically alter the file type to FLC/FLI.
Save File as Type:
This drop down box allows you to select the output file format for a sequence of morph frames. Changing the save type will also change the save options (Color Depth, Compression, and JPEG Quality) that are available. For example, if you select BMP as the output format, you would be able to select a 24 bit, 8 bit, 4 bit, or 1 bit render Color Depth for that format. It is important to remember that not all file formats will have output options such as color depth. These options will only be available for the file types which use them. Also, AVI saves will not prompt you for the type of CODEC to use until the first frame has actually been generated and is ready to save.
Output size:
This is the resolution of the morph results created. It is the main determinate of the output quality. The film strip resolution is not the same as this size; however, the filmstrip quality can never be better than the output resolution.
      For example,
                320 x 200 is a low resolution VGA output,
                640 x 480 is a high resolution VGA,
                768 x 482 is about home video resolution (NTSC).
                768 x 512 is about home video resolution (PAL).
Match Start Aspect Ratio
Matches the output size to the ratio of dimensions of the Start Frame.
Match End Aspect Ratio
Matches the output size to the ratio of dimensions of the End Frame.
Set to Start Frame size
Matches the output size to the exact dimensions of the Start Frame.
Set to End Frame size
Matches the output size to the exact dimensions of the End Frame.
Do one frame...
This generates one "Result" morph frame. The frame number that will be generated was set in the Sequence Controls. The result image will be held by the program and displayed in the result window, therefore, it will not be automatically saved. You should save the result manually if you desire using the Save Result option in the File menu. This selection will allow you to specify the output file format, path, and name.
Sequence generate...
This generates an entire sequence of morph frames. The extent of the sequence was specified in the Sequence Controls and usually goes from Frame # 1 to the last frame (which equals the Total Frames value set in the Sequence Controls .
If the Save Result option was set in the Sequence Controls, then each frame will be saved as it is generated.
Process Alpha
WinImages Morph will morph the alpha channel (image transparency) of images if the original images have alpha channels and if this menu item is checked. The result images will then be created with an alpha channel. Alpha channel information is available from 32-bit Targa files, TIFF files and TRIM files.
If one of these formats is selected as the output format, images will be saved as 32-bit if they have an alpha channel, otherwise as 24-bit. Use the Display Alpha menu option to view the alpha channel associated with an image.
Motion Morph
A motion morph involves a sequence of start frames and a sequence of end frames. Morphing is done between successive pairs of frames. Different control point/lines files are required for positions along the sequence because the subjects in successive pairs of frames have moved. (See the definition of Motion Morphing in the Glossary). This switch tells the program that the current project is going to be a motion morph and will require the sequence of start frames, end frames, and point/lines files to be specified.
Someone new to the program should try a regular morph before tackling motion morphing which adds an extra level of complexity to the process.
Milliseconds per frame
This is the way the frame rate is held inside the program. This is the number of 1/1000 seconds between frames. It is 1000 times the value of microseconds per frame that .AVI files use.
Frames per second
A value of 10 f.p.s. would mean 100 milliseconds per frame.
Jiffies (per frame)
A jiffy is 1/70 th of a second. So a value of seven (7) would represent 10 frames per second.
Specify Motion start frames...
This opens a window holding the list of start frames for a motion morph. A start image has to be specified for every frame of a motion morph. You construct the list by using the following options.
Specify Motion end frames...
This opens a window holding the list of end frames for a motion morph. This window works the same as the Specify Motion start frames window.
Specify Motion point files...
This opens a window holding the list of point files for a motion morph. Point files have to be specified for at least the first frame of a motion morph and should be specified for not too distant intervals along the sequence. This window is similar to the Specify Motion start frames window with the following additions:
A tween entry will make the program attempt to tween (or interpolate) a set of control points or lines for that frame from the closest real point/line files either side of it. For example, you might specify a point set for frame 1 and frame 3 but let the program tween the set for frame 2. The tweening algorithm has a limitation though. Tweened point files must have similar control points and lines in the same order. For example, a file with three points: subjects left eye, right eye, mouth; must have the other tween partner file in the same order: left eye, right eye, mouth. The same holds true for lines and curves. This simply means that you should use the same point files for each frame, and then manipulate the existing points and lines to fit the features for a particular frame.
How do you create point sets that match in this way? You create the first point set, save it, change the current frame, and then move the points without deleting any for the matching set, and then save them.
A skip entry causes the last real point file to be used again. This would be done when two successive frames show no movement.
Once your motion morph project has been set up you should save it in a project file. All the image names and point file names get saved in the project file, but not the point files themselves. You should save them individually.
Load the Motion files for this frame...
This will load the Start and End images and point file for the current frame that you specified for this motion morph project.
If a motion morph project file was loaded then the Motion files for the current frame will be loaded automatically. The files will also get loaded automatically when the current frame number is changed in the Sequence Controls menu option.
| Quick Nav Bar | ||||||||
|---|---|---|---|---|---|---|---|---|
| << Previous | Contents |
Selection |
Op Index |
Parent | User Notes |
Index |
Glossary |
Next >> |
| WinImages F/x Manual Version 7, Revision 5, Level B |