
| Quick Nav Bar | ||||||||
|---|---|---|---|---|---|---|---|---|
| << Previous | Contents |
Selection |
Op Index |
Parent | User Notes |
Index |
Glossary |
Next >> |
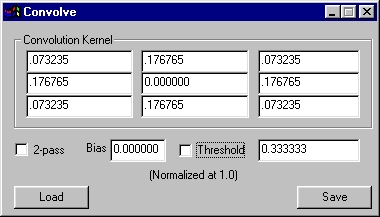
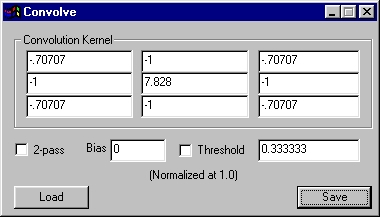
| a=CONVOLVE(tl, tc, tr, l, c, r, bl, bc, br, threshold, USE THRESHOLD, bias, TWO PASS) |
| Items in CAPS are 0/1 switches or switches with more options than 0/1. |
This is a 9-cell convolution. The way it works is the cells in the kernal are placed over the pixels of the image. The pixel under the center cell is the one being affected. All of the pixel values (in each of the RGB channels) are multiplied by the values in the cells over them. So, if the kernal has a one in the center cell and zeroes elsewhere, the end result will be the original value of the center cell, which is then put back - hence no change.
When you make a kernal, you will almost always try to have the values in the cells add up to one.
There are four examples of useful convolutions at the end of this section of the documentation. In order to learn more about them, you can search the web, or refer to most image processing texts. You can do some truly amazing things with them!
When you have created a convolution that you like, you can save it, and reload it later using the controls provided in the dialog.
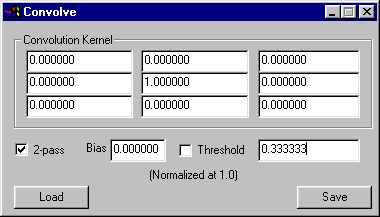
Kernel
These cells represent a floating point number for each pixel of a group. The pixel affected by the convolution is the one in the center; the cells around the center cell are the pixels in the same relative positions.
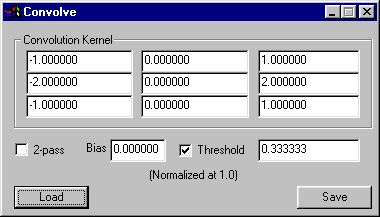
The convolution terms are normalized to one; most convolutions will have a kernal that sums to one in total, as the blur example shown here does. However, at times, you'll want something else, and the Sobel example is one case that demonstrates this.
The sum of the kernal in the Sobel example is zero. If you think about the idea of edge detection, if the image is all the same value, you don't want a result - because there is no edge. So, the sum of zero makes sense - no matter what is in the pixels, if they're all the same, you get a zero output. You only get a non-zero output when the cells differ from one another... and when cells differ from one another by a fair amount, that's what human sight perceives as an edge, and, that's when the Sobel convolution will produce an output!
2 Pass
This allows 2-pass operations such as the Sobel example, below. In 2-pass mode, the kernal is treated differently; always consider the kernal as going from left to right. First, it is passed over the image just as you see it, in a left to right direction. Then, it is passed over the image from top to bottom, with the kernal rotated so that what is the left side in the picture bcomes the top side. In this way, you can define a directional process of two passes. Remember: Left to right is the same as Top to Bottom in 2-pass mode!
Bias
Bias is a value that is added prior to the thresholding operation (if that is turned on.) Bias allows you to bring the output level of the convolution up. A good example of using this is found in the Color Emboss example later in this page. There, the convolution produces both positive and negative output, both of which you want to see. The best way to do so is to embed those values in a middle grey level, and that's exactly what the Bias of 0.5 does in the Emboss example.
Threshold
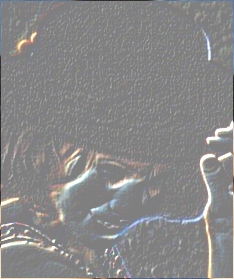
If you turn the Threshold checkmark on, then when the result of the convolution is greater than the threshold, the output is fully on; otherwise, it is fully off. Try the Sobel example, below, both with and without the threshold checked. The difference is quite striking.
Sobel Edge Detection
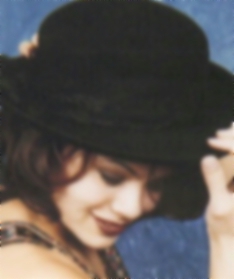
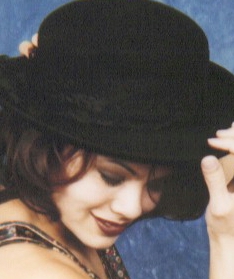 Unmodified Image |
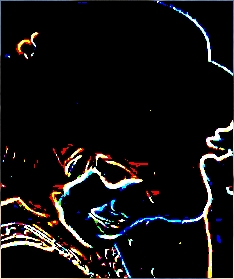 Sobel Edge Detection, threshold of .33333 |
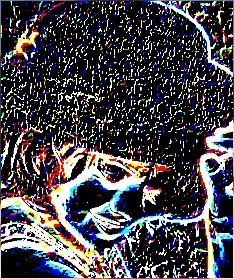 Sobel Edge Detection, Threshold of .1 |
Blur
Unmodified Image |
 Blur (Applied 4 times to emphasize result) |
|
Color Emboss

Unmodified Image |
 Color Emboss |
Sharpen
Unmodified Image |
 Sharpened |
| Quick Nav Bar | ||||||||
|---|---|---|---|---|---|---|---|---|
| << Previous | Contents |
Selection |
Op Index |
Parent | User Notes |
Index |
Glossary |
Next >> |
| WinImages F/x Manual Version 7, Revision 5, Level B |