
| Quick Nav Bar | ||||||||
|---|---|---|---|---|---|---|---|---|
| << Previous | Contents |
Selection |
Op Index |
Parent | User Notes |
Index |
Glossary |
Next >> |
| a=LINED(red, green, blue, PLACE BACK, rback, gback, bback, height) |
| Items in CAPS are 0/1 switches or switches with more options than 0/1. |
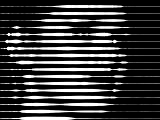
The Lined operation converts the selected area into colored lines based on the images darkness at those points. You can control the line height (which also controls the line spacing, line color, and background color. The resultant effect is similar to the AT&T symbol. The line will vary between 1 pixel for the darkest pixel to the setting of the Height control for the brightest pixel.
Trends
You will notice that all of the controls have a Trend button next to them. The trend button allows you to set that variable over a set of frames. Each frame of the animation can be thought of as a slice of time. The trends allow you to alter some, all, or none of the variables for a particular time slice. You will notice that the trend graphs have equidistantly spaced vertical lines. Each of these lines represents a frame in the animation. The number of frames can be altered using the Sequence controls... in the Timeline pull down menu. Animation lengths of 100 - 999 frames will be represented with a vertical bar being 10 frames, and animation length greater than 1000 frames will have a vertical bar for every 100 frames. Click here to view more information on Trends.
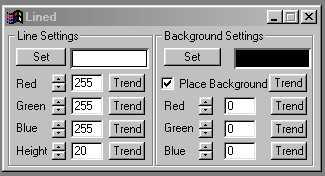
Line Color Preview Window
This preview window will display the color of the line that is to appear in the selected area. This color will change as the Red, Green, and Blue values are altered. As the RGB controls are altered the Background color preview will be updated to reflect the changes.
Red
This slide gadget allows you to specify the Red component of the RGB value for the Line color. This value can be altered by adjusting the sliders or by entering the values. The values for any of the RGB components range from 0 to 255.
Green
This slide gadget allows you to specify the Green component of the RGB value for the Line color. This value can be altered by adjusting the sliders or by entering the values. The values for any of the RGB components range from 0 to 255.
Blue
This slide gadget allows you to specify the Blue component of the RGB value for the Line color. This value can be altered by adjusting the sliders or by entering the values. The values for any of the RGB components range from 0 to 255.
Background Color Preview Window
This preview window will display the color of the background color that is to appear between the lines. This color will change as the Red, Green, and Blue values are altered. As the RGB controls are altered the Background color preview will be updated to reflect the changes.
Place Background
The Place Background control allows you to insert the selected Background Color or to place the lines over the top of the existing image. Placing the background will fill the region between the lines with the background. The area that is filled by the background is symmetrical with the lines. If this control is not selected, the original image will appear between the lines.
Red
This slide gadget allows you to specify the Red component of the RGB value for the Background color. This value can be altered by adjusting the sliders or by entering the values. The values for any of the RGB components range from 0 to 255.
Green
This slide gadget allows you to specify the Green component of the RGB value for the Background color. This value can be altered by adjusting the sliders or by entering the values. The values for any of the RGB components range from 0 to 255.
Blue
This slide gadget allows you to specify the Blue component of the RGB value for the Background color. This value can be altered by adjusting the sliders or by entering the values. The values for any of the RGB components range from 0 to 255.
Height
The height control allows you to specify the maximum height of the lines, and the distance between lines. The height can range between 1 and 100 pixels. The height is set using the slide gadget or by entering the appropriate value in the provided text entry field.
| Quick Nav Bar | ||||||||
|---|---|---|---|---|---|---|---|---|
| << Previous | Contents |
Selection |
Op Index |
Parent | User Notes |
Index |
Glossary |
Next >> |
| WinImages F/x Manual Version 7, Revision 5, Level B |