Page 97
Roll
| Quick Reference to Scripting Command |
|---|
| a=ROLL(x, y, WARPSCROLL) |
| Items in CAPS are 0/1 switches or switches with more options than 0/1. |


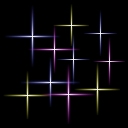
Unmodified Image |
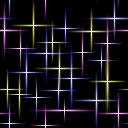
Roll of 115 pixels on X |
Tip: |
This operator may be applied directly to a Warp Layer, resulting in a geometric effect that may be removed from the underlying sublayer composite by simply zeroing out the warp or disabling that layer. In addition, the effect may be moved over the underlying sublayer composite without limit.
A visual reminder that this operator is warp-compatible is the small green dot at the upper right of its ICON in the toolbar.
A special feature of Roll is that there are two ways is can work with a warp. The first is to roll (checkmark off), which modifies the warp itself, in place. The second is to scroll (checkmark on), which physically moves the warping information just as roll affects RGBA data. This has the effect of "looping" warps horizontally and vertically across the layers below them. This is particularly useful for animated effects.
|
|
The Roll operator can rool an image on it's X axis, Y axis, or both axis' at the same time.
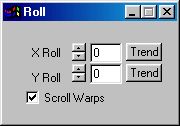
Roll Controls
X Roll
Amount in pixels to roll the image.
Y Roll
Amount in pixels to roll the image.
Scroll Warps
When this option is checked, warps are not modified by the roll geometry; instead, the warp information is rolled as if it were RGBA.
Example Use:
Roll can be very useful in editing certain types images to become useful tiles. You can take an image, roll it 1/2 way on both X and Y, and then edit the edges so that they blend perfectly, this is much more easily done than previously, because the edges are now in the horizontal and vertical center of the image. When you're done with this, you can roll the image back where it was, or simply leave it in the rolled state. The image will tile depending on how well you were able to blend the edges. But it will tile at the same quality no matter if you roll it back, or not. It will change how the tile lays; that is, the edges will appear slightly offset, but in many cases this isn't important to the effect.
Another way to approach the creation of a tile is to:
- Create a blank image
- Work only up to, but into the edges of the image
- Roll the image 50% horizontally and vertically
- Again, work up to, but not into, the current edges of the image
- Unroll the image (or not, it's up to you. The tile is done.
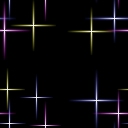
The 512 x 512 Tiling of the tile in step 3, above:

Notice how there is no horizonal break - in all cases, the tile overlays itself. There is a vertical break because we didn't fill the center of the tile in step 2 of the tile creation. You can create endless variations on this theme!
|
Page 97
WinImages F/x, WinImages Morph and all associated documentation
Copyright © 1992-2007 Black Belt Systems
ALL RIGHTS RESERVED Under the Pan-American Conventions
| WinImages F/x Manual Version 7, Revision 5, Level B |
HTML Documentation Management System © 1992-2007 Black Belt Systems