
| Quick Nav Bar | ||||||||
|---|---|---|---|---|---|---|---|---|
| << Previous | Contents |
Selection |
Op Index |
Parent | User Notes |
Index |
Glossary |
Next >> |
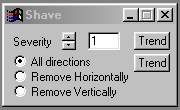
| a=SHAVE(severity, DIRECTION[0-2]) |
| Items in CAPS are 0/1 switches or switches with more options than 0/1. |
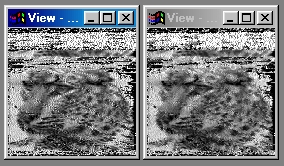
The Shave operation allows you to remove noise and artifacts from images. This can range from single pixels to entire chunks of pixels. This process is a decision based removal system. This means that the pixels are eliminated based on the number of similar pixels in the group, and the colors of each pixel in the group. You can control the Severity of the removal. This severity can range from pixel or dither removal to a very harsh low pass filter. The severity control is analogous to a group of razors which range from dull to sharp. A low severity (dull razor) will shave fewer pixels from the image, and a high severity (sharp razor) will shave more pixels from the image.
Trends
You will notice that all of the controls have a Trend button next to them. The trend button allows you to set that variable over a set of frames. Each frame of the animation can be thought of as a slice of time. The trends allow you to alter some, all, or none of the variables for a particular time slice. You will notice that the trend graphs have equidistantly spaced vertical lines. Each of these lines represents a frame in the animation. The number of frames can be altered using the Sequence controls... in the Timeline pull down menu. Animation lengths of 100 - 999 frames will be represented with a vertical bar being 10 frames, and animation length greater than 1000 frames will have a vertical bar for every 100 frames. Click here to view more information on Trends.
Severity
The Severity control allows you to remove pixels or groups of pixels based on its setting. The control ranges from a setting of 1 (lowest severity) to 16 (highest severity). A setting of 1 will result in a remove isolated pixel operation. This will examine all of the pixels in the selected area, and remove any pixels that are not the same as any of its surrounding pixels. Increasing the severity will decrease the requirements for removal, thus more pixels or pixel groups will be removed. Once a pixel is removed, it will be replaced with an average of its surrounding colors. The severity setting is a good method for removing excessive dither in an image. A setting of 16 would act like a severe low pass filter. This means that areas in the selected region would become blurred as pixels or groups of pixels are removed and replaced with a color average. This control is set using the slide gadget, or by entering an appropriate value in the text entry field to the right.
Direction
The Direction control allows you to select the direction in which image element (pixels, chunks, lines, etc.) are removed or replaced in the image area selection. The direction can be set to replace/remove horizontally, vertically, or in all directions. The direction is set by clicking on the desired radio button, and then applying the effect to an area selection.
| Quick Nav Bar | ||||||||
|---|---|---|---|---|---|---|---|---|
| << Previous | Contents |
Selection |
Op Index |
Parent | User Notes |
Index |
Glossary |
Next >> |
| WinImages F/x Manual Version 7, Revision 5, Level B |