
| Quick Nav Bar | ||||||||
|---|---|---|---|---|---|---|---|---|
| << Previous | Contents |
Selection |
Op Index |
Parent | User Notes |
Index |
Glossary |
Next >> |
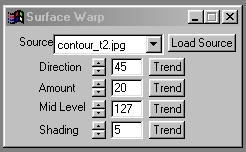
| a=SURFWARP(direction, amount, mid level, shading) |
| Items in CAPS are 0/1 switches or switches with more options than 0/1. |
|
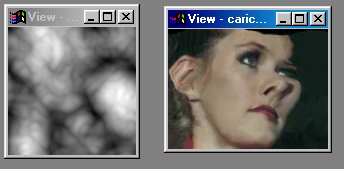
Surface Warping allows you to warp an area in an image view, and warp it based on the information in a specified source image. The action image is warped based on changes in brightness in the source image. You can control the direction of the warp, the amount, and the shading. This effect can be used with text to create a raised or bubbled glass effect, or over an animation sequence to give a pseudo 3-D look to a stream of images. The operation can be carried out on any area in the action image, but is best suited for use with the Entire area selection tool.
Trend
You will notice that all of the controls have a Trend button next to them. The trend button allows you to set that variable over a set of frames. Each frame of the animation can be thought of as a slice of time. The trends allow you to alter some, all, or none of the variables for a particular time slice. You will notice that the trend graphs have equidistantly spaced vertical lines. Each of these lines represents a frame in the animation. The number of frames can be altered using the Sequence controls... in the Timeline pull down menu. Animation lengths of 100 - 999 frames will be represented with a vertical bar being 10 frames, and animation length greater than 1000 frames will have a vertical bar for every 100 frames. Click here to view more information on Trends.
Source Image Drop Down Box
The Source Image Drop Down Box and the Load Source button allow you to select the source image that is to be used for the surface warp operation. Clicking on the drop down box's down arrow will open the box with a list of all of the currently loaded image files. If you have no image loaded, then this box will be empty. You can load a new image, and assign it as the source image by clicking on the Load Source button. This will present you with a file requester for selecting the new source image file. Once the file has been selected, and loaded, it will automatically be specified as the source image. The source image determines how the action view will be warped based on the brightness values in the source image.
Direction
The direction control allows you to specify the direction that the action image surface will be warped to. This direction is specified as an angle value ranging 0 to 359 degrees. The angle is measured vertically from clockwise (please refer to the diagram on the left). Altering this direction over a sequence of frames can cause the surface warp to shift its position in a circular manner. The Direction control can also be thought of as the direction of the light source that is being applied to the source image to cause the surface warp. The Direction angle can be set using the provided slide gadget or manually entered into the text entry area.
Amount
The amount control allows you to scale the intensity of the surface warp operation. The control ranges from a setting of 0 (no effect) to 100 (maximum surface warping). The larger the percentage value the more dramatic the effect. Increasing the amount control can also have negative effects such as distortions which are too extreme. If this is the case, you will have to decrease the amount control, and try to intensify the effect through the use of the Mid Level or Shading controls.
Mid Level
The Mid Level control allows you to set where the middle luminance (flat areas) will appear in the image. The surface warp operation is based on warping the action image based on luminance or brightness values in the source image. These values can range from 0 (black) to 255 (white). altering the Mid Level control will change where the program sets the flat area or "ground level" of the surface warp. For example, using the default Mid Level setting of 127 will result in all luminance values above 127 being warped "up", and all values below 127 being warped "down". This is how the program is able to create the new warped surface. This Mid Level value can be altered so that certain luminance levels equate a low or high spot in the image. For example, If you have a source image with large areas of black which you would like to have as a flat region instead of as a depressed region, you would simply set the Mid Level control to 0. Now, all areas in the image that are black (luminance= 0) will appear unwarped, and all luminance values greater than 0 will appear as an elevation.
Shading
The shading control allows you to control how much shading is applied to the surface warp. The shading amount is a percentage value ranging from 0 (no shading) to 100 (maximum shading). This value will determine how the surface warp will be shaded; the greater the shading percentage, the greater the amount of shading in the "depressed regions" of the surface warp. This control can also be related to the intensity of the light source. The greater the shading percentage the, the greater the intensity of the light source.
| Quick Nav Bar | ||||||||
|---|---|---|---|---|---|---|---|---|
| << Previous | Contents |
Selection |
Op Index |
Parent | User Notes |
Index |
Glossary |
Next >> |
| WinImages F/x Manual Version 7, Revision 5, Level B |