| Quick Nav Bar | ||||||||
|---|---|---|---|---|---|---|---|---|
| << Previous | Contents |
Selection |
Op Index |
Parent | User Notes |
Index |
Glossary |
Next >> |
| a=TURN90(MODE[0-3]) |
| Items in CAPS are 0/1 switches or switches with more options than 0/1. |


|
The Turn 90 operation is used to flip an image region or the entire image in 90 degree increments. This tool can be used to rotate any area selection, but it primary strength lies in rotating an entire image. If you need to rotate an area or the entire image by an amount other than these 90 degree increments, you should use the Rotate operation.

Trends
You will notice that all of the controls have a Trend button next to them. The trend button allows you to set that variable over a set of frames. Each frame of the animation can be thought of as a slice of time. The trends allow you to alter some, all, or none of the variables for a particular time slice. You will notice that the trend graphs have equidistantly spaced vertical lines. Each of these lines represents a frame in the animation. The number of frames can be altered using the Sequence controls... in the Timeline pull down menu. Animation lengths of 100 - 999 frames will be represented with a vertical bar being 10 frames, and animation length greater than 1000 frames will have a vertical bar for every 100 frames. Click here to view more information on Trends.
90 Degree Rotation
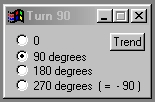
Each of these radio buttons represents a 90 degree rotation factor. Selecting the 0 degrees button will result in no effect on the selected area. Selecting 90 degrees will rotate the area by 90 degrees. The remaining two settings will rotate the area selection by 180 degrees or 270 degrees. This tool can be used to rotate any area selection, but it primary strength lies in rotating an entire image. If you need to rotate an area or the entire image by an amount other than these 90 degree increments, you should use the Rotate operation.
| Quick Nav Bar | ||||||||
|---|---|---|---|---|---|---|---|---|
| << Previous | Contents |
Selection |
Op Index |
Parent | User Notes |
Index |
Glossary |
Next >> |
| WinImages F/x Manual Version 7, Revision 5, Level B |