
| Quick Nav Bar | ||||||||
|---|---|---|---|---|---|---|---|---|
| << Previous | Contents |
Selection |
Op Index |
Parent | User Notes |
Index |
Glossary |
Next >> |
| a=MELT(amount, DIRECTION[0-3], start, end) |
| Items in CAPS are 0/1 switches or switches with more options than 0/1. |
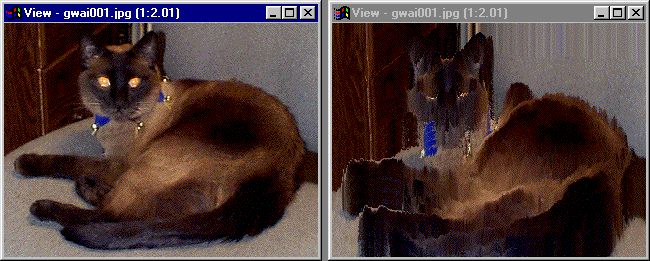
The melt operation allows you to produce a 'melting' effect on an image. Each pixel is displaced in full color geometrically according to it's luminance.
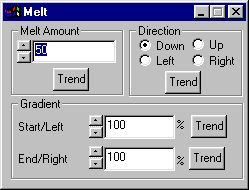
Melt Amount
This governs the severity of the distortion. A small number will cause little distortion while a large number may leave nothing but the darkest parts of the image behind. This portion is best left constant in a timeline with accumulate changes selected, to give the impression of a steady flow, although trending the 'melt amount' can be used to similar ends.
Direction
This governs the direction in which the distorting image 'flows'. The distortion can move up, down, left or right.
|
Gradient
This allows you to choose the proportion by which either end of the selection is distorted, and will be interpolated throughout. For example, if you chose 0% on top and 100% on bottom, the distortion will increase from top to bottom.
|
Trend
Some of the controls have a Trend button next to them. These trend buttons allow you to set variables over a series of frames. Each frame of any animation may be thought of as a slice of time. The trends allow you to alter some, all, or none of the variables for a particular time slice. Trend graphs have equidistantly spaced vertical lines. For animations under 100 frames in length, each of these lines represents a frame in the animation. The number of frames in any one sequence can be altered using the Sequence controls item from the Timeline pull down menu. Animation lengths of 100 - 999 frames will be represented with a vertical bar being 10 frames, and animation length greater than 1000 frames will have a vertical bar for every 100 frames. Click here to view more information on Trends.
| Quick Nav Bar | ||||||||
|---|---|---|---|---|---|---|---|---|
| << Previous | Contents |
Selection |
Op Index |
Parent | User Notes |
Index |
Glossary |
Next >> |
| WinImages F/x Manual Version 7, Revision 5, Level B |