
| Quick Nav Bar | ||||||||
|---|---|---|---|---|---|---|---|---|
| << Previous | Contents |
Selection |
Op Index |
Parent | User Notes |
Index |
Glossary |
Next >> |
| a=REFRACT(rotation) |
| Items in CAPS are 0/1 switches or switches with more options than 0/1. |
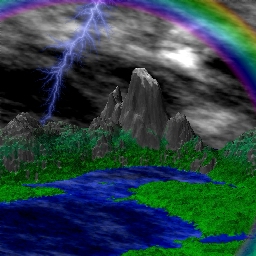
The Refract operation uses both radial and circumferential profiles to create effects that are similar to refractions and interference patterns. Refraction is the bending of light as it passes from one medium to another. Refraction of light is a very common occurrence in nature, and can be seen in rainbows, sunrises, sunsets, and glass prisms. The Refract effect can also be used to create interference patterns such as light passing through silk. The best way to become familiar with this function is to read the descriptions of the controls below, and then apply and view the profiles of one of the provided presets. Doing this will help you to better visualize circumferential and radial change. This operation is best suited for use with the Ellipse area selection tool.
|
Trends
You will notice that all of the controls have a Trend button next to them. The trend button allows you to set that variable over a set of frames. Each frame of the animation can be thought of as a slice of time. The trends allow you to alter some, all, or none of the variables for a particular time slice. You will notice that the trend graphs have equidistantly spaced vertical lines. Each of these lines represents a frame in the animation. The number of frames can be altered using the Sequence controls... in the Timeline pull down menu. Animation lengths of 100 - 999 frames will be represented with a vertical bar being 10 frames, and animation length greater than 1000 frames will have a vertical bar for every 100 frames. Click here to view more information on Trends.
Profiles
|
|
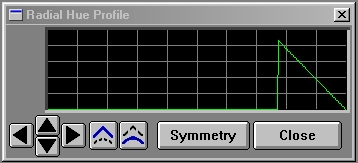
This operation uses a number of profiles. Each profile has the following controls:
The directional arrows will move the curve the specified direction. This allows you to move the curve left, right, up, or down. Moving the curve up or down will flatten the top or bottom edge. Moving the curve left or right will simply shift the graph horizontally left or right. All changes to the arm profile can be saved using the Save option in the main asterize dialog.
The enhance option (blue peak) will increase the peaks and valleys in the curve. If you click on the enhance option the graph will then be amplified at its low and high points.
The smooth option (blue curve) will smooth any rough edges that are detected in the graph. This option will create a smoother graph with fewer rough edges.
The Symmetry option, when pressed, will make the graph have reflective symmetry. This means that any changes made to the left side of the graph are reflected to the right side of the graph. This option simplifies creating Asterizations that look smooth and even.
The close button will close the arm profile. The newly created profile will then be used in the next asterize operation, unless one of the preset asterize operations is selected first. Selecting one of the presets will alter the profile to fit the preset's specifications. This dialog can also be closed by double clicking on the System Menu box or by pressing Alt F4.
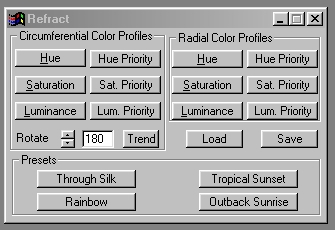
Circumferential H,S,L Profiles: The Circumferential profiles allow you to specify the Hue, Saturation, and Luminance along the circumference of the selected area. The Hue profile is used to specify the color to be placed circumferentially. Hue can be thought of as the basic colors of the rainbow. Other colors are created by altering the Saturation and Luminosity. The hue can range from 0 to 360 degrees. The vertical axis of the Hue trend is the Hue value, and the horizontal axis is the circumferential position measured counterclockwise from vertical. The Saturation profile allows you to specify the purity of the current hue. The Luminosity is the brightness of the current hue. These settings are used in conjunction with the Priority profiles to create colors along the circumference of the selected area. These colors can then be mixed with the settings of the radial colors to create refraction effects. You will notice that the presets for the Tropical Sunset and Outback Sunrise are primarily Circumferential settings.
Circumferential H,S,L Priority Profiles: The priority profile allows you to specify which component (circumferential or radial) will have the priority at a given position. Setting the Circumferential Hue Priority to the very top of the profile graph means that only the Hue settings of the Circumferential Hue profile will be used. The same is true for Saturation and Luminosity. At this time you may wish to view the profile and priority profile graphs of one of the presets.
Radial H,S,L Profiles: The Radial profiles allow you to specify the Hue, Saturation, and Luminance along the radius of the selected area. The Hue profile is used to specify the color to be placed radially. Hue can be thought of as the basic colors of the rainbow. Other colors are created by altering the Saturation and Luminosity. The hue can range from 0 to 360 degrees. The vertical axis of the Hue trend is the Hue value, and the horizontal axis is the radial position measured from the center of the area select to the edge. The Saturation profile allows you to specify the purity of the current hue. The Luminosity is the brightness of the current hue. These settings are used in conjunction with the Priority profiles to create colors along the radius of the selected area. These colors can then be mixed with the settings of the circumferential colors to create refraction effects. You will notice that the preset for the Rainbow is primarily Radial settings.
Radial H,S,L Priority Profiles: The priority profile allows you to specify which component (radial or circumferential) will have the priority at a given position. Setting the Radial Hue Priority to the very top of the profile graph means that only the Hue settings of the Radial Hue profile will be used. The same is true for Saturation and Luminosity. At this time you may wish to view the profile and priority profile graphs of one of the presets.
Rotate: This control allows you to set the rotation angle of the refraction. The angle can range from 0 to 360 degrees, and the rotation angle is measured from vertical moving clockwise (please refer to the diagram on the left.). The angle of rotation can be set using the slide gadget or by entering the appropriate value for the angle.
Presets
Through Silk: The Through Silk preset creates a simulation of the interference pattern created by holding a piece of silk up to a bright light source. This preset uses mainly circumferential changes.
Rainbow: This preset will create a rainbow effect in the selected area. This preset is best suited for use with a dark blue to black background color. This preset uses mainly radial changes.
Tropical Sunset: The Tropical Sunset preset creates a mainly circumferential refraction that is similar to a sunset in the tropics. This preset is best suited for use with a dark blue to black background color.
Outback Sunrise: This preset creates a refraction effect that is similar to a sunrise in the Australian Outback. This preset is best suited for use with a dark blue to black background color.
Load
This control allows you to load a previously saved set of Refract settings. The settings file will contain all of the trend and profile information.
Save
The Save control allows you to save the current settings for later use. All of the profiles and trend information will be saved into the settings file.
| Quick Nav Bar | ||||||||
|---|---|---|---|---|---|---|---|---|
| << Previous | Contents |
Selection |
Op Index |
Parent | User Notes |
Index |
Glossary |
Next >> |
| WinImages F/x Manual Version 7, Revision 5, Level B |